Wednesday, June 13, 2012
Twitterpated Gift
Each month as a Stampin' Up! Demonstrator I get a magazine in the mail full of ideas and tips. Back in March, one of the ideas (along with step by step instructions) was this cute little gift idea. I did change up the colors and Designer Paper, but that's where I got the concept.
It's easy to change the length of the tube by changing the dimensions, but I started with a 5" by 5" piece of Island Indigo card stock and then scored every 7/8" along one side for a total of 5 score marks. Note: the new Simply Scored Scoring Tool makes this job easy--especially if you are making multiples.
Assemble the tube, and then add the ends--Fancy Flower punches. Genius that someone figured that out! Just score to help the 'petals' fold down easier onto the box. Oh, and remember to fill your tube before you glue down the second end! I put Hershey kisses in mine.
I embellished with Twitterpated Designer Series Paper, Riding Hood Red Pleated Satin Ribbon (no longer available), and a tag. The image is from the Perfect Punches stamp set and then punched out with the Curly Label punch. The both flowers come from the Boho Blossoms punch, are stacked, and then have a pearl in the middle.
Next time you need a 'little something' for a friend give one of these little boxes a try. :-)
Stamps: Perfect Punches
Ink: Island Indigo
Paper: Riding Hood Red, Island Indigo, Whisper White, Twitterpated Designer Series Paper
Accessories: Simply Scored Score Tool, Fancy Flower punch, Curly Label punch, Boho Blossoms punch, White Baker's Twine, Riding Hood Red Pleated Satin Ribbon, pearls
Monday, June 11, 2012
Father's Bow Ties
I can't believe that Father's Day is almost here! Where has the year gone? It's a good thing that I saw THIS adorable card over on Stampin' Connection (website for Stampin Up demonstrators) by the talented, Artisan Award winning Heather Klump, to get me going. I liked this idea of creating bow ties and tried a couple different combinations. With my husband's suggestion that it was a little more masculine, we made the gray and yellow one for club this month.
The bow ties were created using the Pennant Punch, and the 3/4" circle punch. I used the paper piercing tool and mat pack to go around the edge of the white layer. For the banners I stamped, (from the set Delightful Dozen) colored in with the coordinating color using the very fine end of my markers, and then hand cut the shape.
The buttons are from the Brights Designer Buttons collection, and both of the cards use a combination of papers from both the Twitterpated DSP set and the Summer Smooches DSP set (Daffodil Delight paper and Real Red polka-dots).
Remember all the fathers in your life this coming Sunday the 17th!
Stamps: Delightful Dozen
Ink: Basic Black, Real Red marker, Basic Gray, Daffodil Delight marker
Paper: Daffodil Delight, Basic Gray, Real Red, Baja Breeze, Whisper White
Accessories: Brights Designer Buttons, 3/4" circle punch, Petite Pennants Builder punch, Paper Piercing Tool, Mat Pack, Hemp Twine, dimensionals
Friday, June 8, 2012
Blossom Pie
For me, the hardest part of keeping up with my blogging is actually writing each post. This card is the perfect example. . . I created it for our April Stampers Club, took a picture, added the watermark and have had it 'ready to go' since then. But for some reason I just don't actually take the time to post it to my blog. Anyway, I'm going to try to be better (again!) about actually posting to my blog. Most of the time I've already done all the hard part, it's just a matter of finishing. :-)
So, this simple card showcases the stamp set Bright Blossoms. It is new to the catalog, but was a sneak peek during the month of April. This is a fun set because you can interchange the various tops with the bottoms. The pattern on the bottom of the card was created by repeatedly stamping one of the flower tops.
The 'frame' is from the Designer Frames Folders textured impressions embossing set. After I embossed with the Big Shot, I cut it out and then added a small slit along the right edge. I took my Linen Thread and wrapped it around (through the slit) a couple times and then tied it off with the tag. The effect was actually a little less 'visable' than I was thinking it would be. :-)
Thanks for stopping by!
Stamps: Bright Blossoms, Tiny Tags
Ink: Early Espresso, Old Olive, and Pumpkin Pie markers, Versamark
Paper: Early Espresso, Pumpkin Pie, and Whisper White
Accessories: Jewelry Tag Punch, Designer Frames Textured Impressions Embossing Folder, Big Shot, Cutter Kit, Linen Thread, Whisper White grosgrain ribbon, dimensionals
Wednesday, June 6, 2012
Betsy's Leaves
Hi there! Another card today using the Besty's Blossoms stamp set and the new In Color Gumball Green. As I've used this new green, I've really come to like it. It is bright and fresh feeling, but not so much that you can't still use it for leaves and still have it feel 'real' enough to be nature-ish. If that makes any sense!
Anyway, I also used a fun, super-simple technique. To get the 'shadow' look behind the leaves I stamped using my "B" clear mount block. Just the block itself, no stamp attached. I was actually surprised how well the block picked up the ink. I stamped with Certainly Celery, stamped off once onto scratch paper and then onto the card, and still had plenty of ink to get this effect.
The leaves image actually has a longer stem, but I just inked the part I wanted to stamp. I initially planned to make this a one-layer card, but messed up :-) so I turned it over, stamped again, and then trimmed it down and added it to a card base. Ended up the same style as the last card I posted, but I think it turned out ok in the end.
Stamps: Betsy's Blooms, Teeny Tiny Wishes
Ink: Gumball Green and marker
Paper: Whisper White
Accessories: Linen Thread, Clear Mount Block B, dimensionals
Monday, June 4, 2012
New Blossoms
Happy Monday! Back today with a look at another one of the new stamp sets from the catalog. This one is called Betsy's Blossoms. I saw a similar card in THIS post by Mindy over at Bada-Bing! Paper-Crafting! I started out to copy her design, and then ended up changing it a little bit as I got going.
This card uses two of the new 2012-2014 In Colors--Gumball Green and Summer Starfruit. The ribbon is also new--3/8" Stitched Satin Ribbon--in Gumball Green. I really like this ribbon as it ties very easily.
I stamped the bird image and then ran it through the Big Shot to cut it out with one of the new Apothecary Accents Framelits dies (the same ones that coordinate with the Layered Labels set). I stamped the sentiment and then ran it through the Big Shot with one of the new Bitty Banners Framelits dies. I trimmed off the edge and added a brad. I'm really loving all of the Framelits Dies!
You may notice the black edge along the Whisper White layers. . . I simply ran the edge of my Basic Black marker along all of the edges--even of the card base. Sometime I do this technique when I want a little more definition, but not necessarily another layer of card stock. Makes the layers 'pop' just a little bit.
Happy Stamping!
Stamps: Betsy's Blooms
Ink: Summer Starfruit, Gumball Green, Basic Black marker
Paper: Whisper White
Accessories: 3/8" Stitched Satin Ribbon, 3/16" Neutrals Brads, Big Shot, Apothecary Accents Framelits dies, Bitty Banners Framelits dies, dimensionals
Friday, June 1, 2012
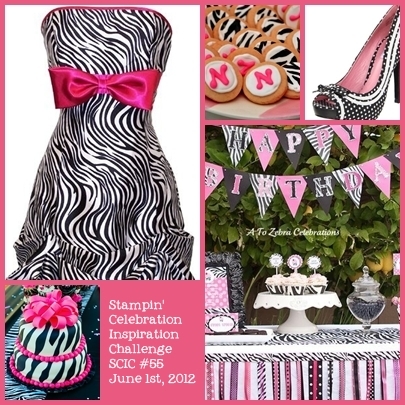
Stampin' Celebration #55
What an exciting day! Not only do we have a new Stampin' Celebration challenge, we have a brand new Stampin Up catalog! You can see a pdf of the catalog HERE or a flash version of the catalog HERE. It's always so fun to have new stamp sets, accessories and tools. :-)
If you are following the blog hop in order, you just came from Rochelle's blog--I stamp, I create, I have fun!
This month we have a fun extra-girly inspiration piece! I loved the colors, and then of course wanted to try out some of my new items. The card uses the new stamp set Layered Labels. This is a cool stamp set since each of the stamps have a coordinating Framelit Die (the Apothecary Accents set).
I stamped the largest image with Basic Black craft ink onto Whisper White card stock and heat embossed with Clear powder. The next layer was stamped with Primrose Petals (one of the new In Colors!) and then run through the Big Shot with the coordinating framelits die to cut it out.
I used another stamp from the same set for the sentiment. I used a marker to ink just the word and then stamped. I hand-cut the banner and added two little circles of Primrose Petals to the edges. I used Crystal Effects to cover the little circles--giving it a faux-brad look. There are dimensionals under the Basic Black oval.
Now it's your turn to participate in the Stampin' Celebration challenge! Simply create a card, 3D item, digital
item, scrapbook layout, etc. using the inspiration piece above. Leave a
comment on the Stampin' Celebration blog
with a link to your blog or online gallery so we can see your project.
You have until the 25th of the month to create your project. We will
choose the "Pick of the Party" at the end of the month.
All of the Design Team posts for Challenge #55:
Allison Ohran -Sweet Impressions (you are here)
Candace Lawlor - not participating this month
Cori Kozak - Creative Chat
Erica Cerwin - Pink Buckaroo Designs
Erin Gonzales -Hand Stamped Style
Krystal De Leeuw - Krystal's Cards
Marlene Peters - not participating this month
Rochelle Gould - I stamp, I create, I have fun!
Stampin' Celebration Inspiration Challenge
Subscribe to:
Posts (Atom)